
RLX COMPONENTS s.r.o. , Electronic Components Distributor.
RLX COMPONENTS s.r.o. , Electronic Components Distributor.
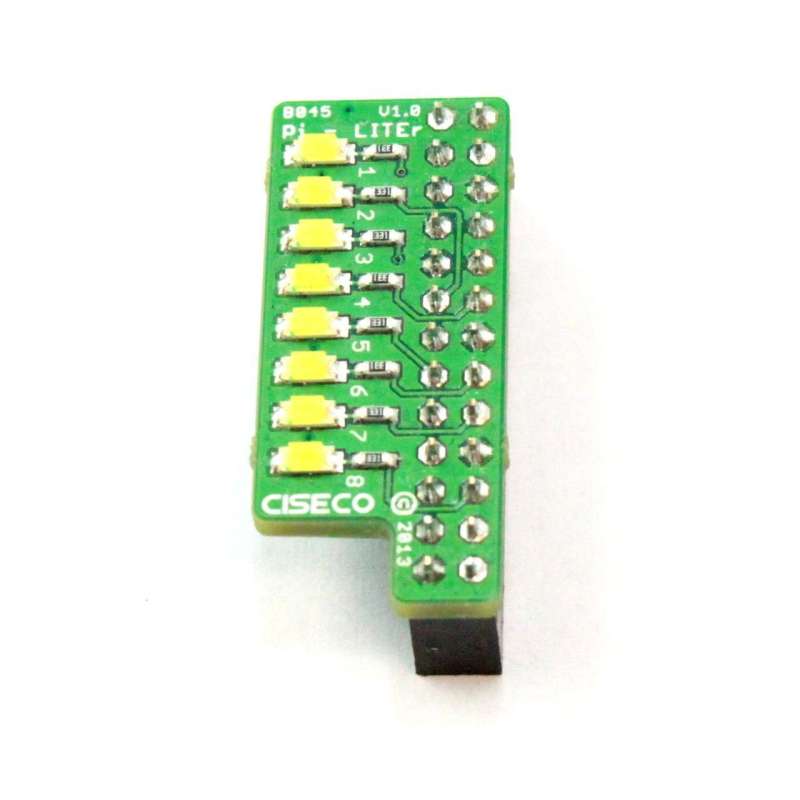
Pi-LITEr - 8 LED strip for the Raspberry Pi (CISECO B045)
http://www.youtube.com/watch?feature=player_embedded&v=CXKS7L0HPKM
http://www.youtube.com/watch?feature=player_embedded&v=KY1kvakZ1cU
Product description
The Pi-LITEr is a fully assembled add on board for the Raspberry Pi computer. It has 8 ultra-bright white LED's on a board which plugs directly on to the 26 way GPIO header.
For fun but also for more serious applications, the Pi-LITEr is a must have edition to any Pi owners toolbox.
Each of the 8 LEDs consumes a tiny amount of current; this means the Pi-LITEr can often be used alongside other I/O projects to give status indication. Lighting all 8 LEDs is even less than a single standard LED (which is 20ma nominal vs 14.4ma for the Pi-LITEr).
If you need to expand your GPIO header to support another connection, the Ciseco Pi Wingman is the product you will find perfect for the job.
Features:
• 8 Ultra bright white LED’s
• Low current consumption
• Simply plugs in
• Economical
• Fits in many case types
• Gold plated circuit board
Applications:
• I/O status indicator
• Bar graph
• Light chaser
• Activity indicator
• Lighting effects
Technical data
Length: 34.5mm
Width: 15 mm
Depth: 11.5 mm
Weight: 4.4 grams
Supply voltage: 3.3v
Current per LED lit: 1.8ma
Current all LED's lit: 14.4ma
Downloads
Install guide and datasheet - http://ciseco.co.uk/docs/Pi-LITEr-v-0-1.pdf
Software compatibility
We have had success with the two most common ways to control the I/O pins on the Raspberry Pi; RPi.GPIO and WiringPi.
We chose to use WiringPi in conjunction with WiringPi2Python for our example code.
Code example - run all LED's at random (reminds me a little of WOPA from war games)
# make sure you run this under sudo python xxxxxfilename
# writen by ciseco 2013 - www.ciseco.co.uk
# you may use this code in any way you wish, an acknowledgement is always good :)

import random
random.random()
import wiringpi2 as wiringpi
wiringpi.wiringPiSetup()
from time import sleep
str = 0
str2 = 0
delay = 0.08
loop = 1
wiringpi.pinMode(7,1) #Setup pin 7 as out put for LED 1
wiringpi.pinMode(0,1) #Setup pin 0 as out put for LED 2
wiringpi.pinMode(2,1) #Setup pin 2 as out put for LED 3
wiringpi.pinMode(1,1) #Setup pin 1 as out put for LED 4
wiringpi.pinMode(3,1) #Setup pin 3 as out put for LED 5
wiringpi.pinMode(4,1) #Setup pin 4 as out put for LED 6
wiringpi.pinMode(5,1) #Setup pin 5 as out put for LED 7
wiringpi.pinMode(6,1) #Setup pin 6 as out put for LED 8

while (loop < 10):
    str = random.randint(0,7)
    str2 = random.randint(0,1)
    wiringpi.digitalWrite(str,str2)
    sleep(0.03)

print "ENDED!"

N.B. Some browsers misinterpret the tabs/spacing, if you get an error in Python, delete the spacing and redo with the TAB key


Code example - Night Rider or Cylon style LED scanner

# make sure you run this under sudo python xxxxxfilename
# writen by ciseco 2013 - www.ciseco.co.uk
# you may use this code in any way you wish, an acknowledgement is always good :)</h2>
import wiringpi2 as wiringpi
wiringpi.wiringPiSetup()
from time import sleep
delay = 0.08
loop = 1
wiringpi.pinMode(7,1) #Setup pin 7 as out put for LED 1
wiringpi.pinMode(0,1) #Setup pin 0 as out put for LED 2
wiringpi.pinMode(2,1) #Setup pin 2 as out put for LED 3
wiringpi.pinMode(1,1) #Setup pin 1 as out put for LED 4
wiringpi.pinMode(3,1) #Setup pin 3 as out put for LED 5
wiringpi.pinMode(4,1) #Setup pin 4 as out put for LED 6
wiringpi.pinMode(5,1) #Setup pin 5 as out put for LED 7
wiringpi.pinMode(6,1) #Setup pin 6 as out put for LED 8
while (loop < 10):
    wiringpi.digitalWrite(7,1) #LED 1 on
    sleep(delay)
    wiringpi.digitalWrite(7,0) #LED 1 off
    wiringpi.digitalWrite(0,1) #LED 2 on
    sleep(delay)
    wiringpi.digitalWrite(0,0) #LED 2 off
    wiringpi.digitalWrite(2,1) #LED 3 on
    sleep(delay)
    wiringpi.digitalWrite(2,0) #LED 3 off
    wiringpi.digitalWrite(1,1) #LED 4 on
    sleep(delay)
    wiringpi.digitalWrite(1,0) #LED 4 off
    wiringpi.digitalWrite(3,1) #LED 5 on
    sleep(delay)
    wiringpi.digitalWrite(3,0) #LED 5 off
    wiringpi.digitalWrite(4,1) #LED 6 on
    sleep(delay)
    wiringpi.digitalWrite(4,0) #LED 6 off
    wiringpi.digitalWrite(5,1) #LED 7 on
    sleep(delay)
    wiringpi.digitalWrite(5,0) #LED 7 off
    wiringpi.digitalWrite(6,1) #LED 8 on
    sleep(delay)
    wiringpi.digitalWrite(6,0) #LED 8 off
    wiringpi.digitalWrite(5,1) #LED 7 on
    sleep(delay)
    wiringpi.digitalWrite(5,0) #LED 7 off
    wiringpi.digitalWrite(4,1) #LED 6 on
    sleep(delay)
    wiringpi.digitalWrite(4,0) #LED 6 off
    wiringpi.digitalWrite(3,1) #LED 5 on
    sleep(delay)
    wiringpi.digitalWrite(3,0) #LED 5 off
    wiringpi.digitalWrite(1,1) #LED 4 on
    sleep(delay)
    wiringpi.digitalWrite(1,0) #LED 4 off
    wiringpi.digitalWrite(2,1) #LED 3 on
    sleep(delay)
    wiringpi.digitalWrite(2,0) #LED 3 off
    wiringpi.digitalWrite(0,1) #LED 2 on
    sleep(delay)
    wiringpi.digitalWrite(0,0) #LED 2 off

print "ENDED!"